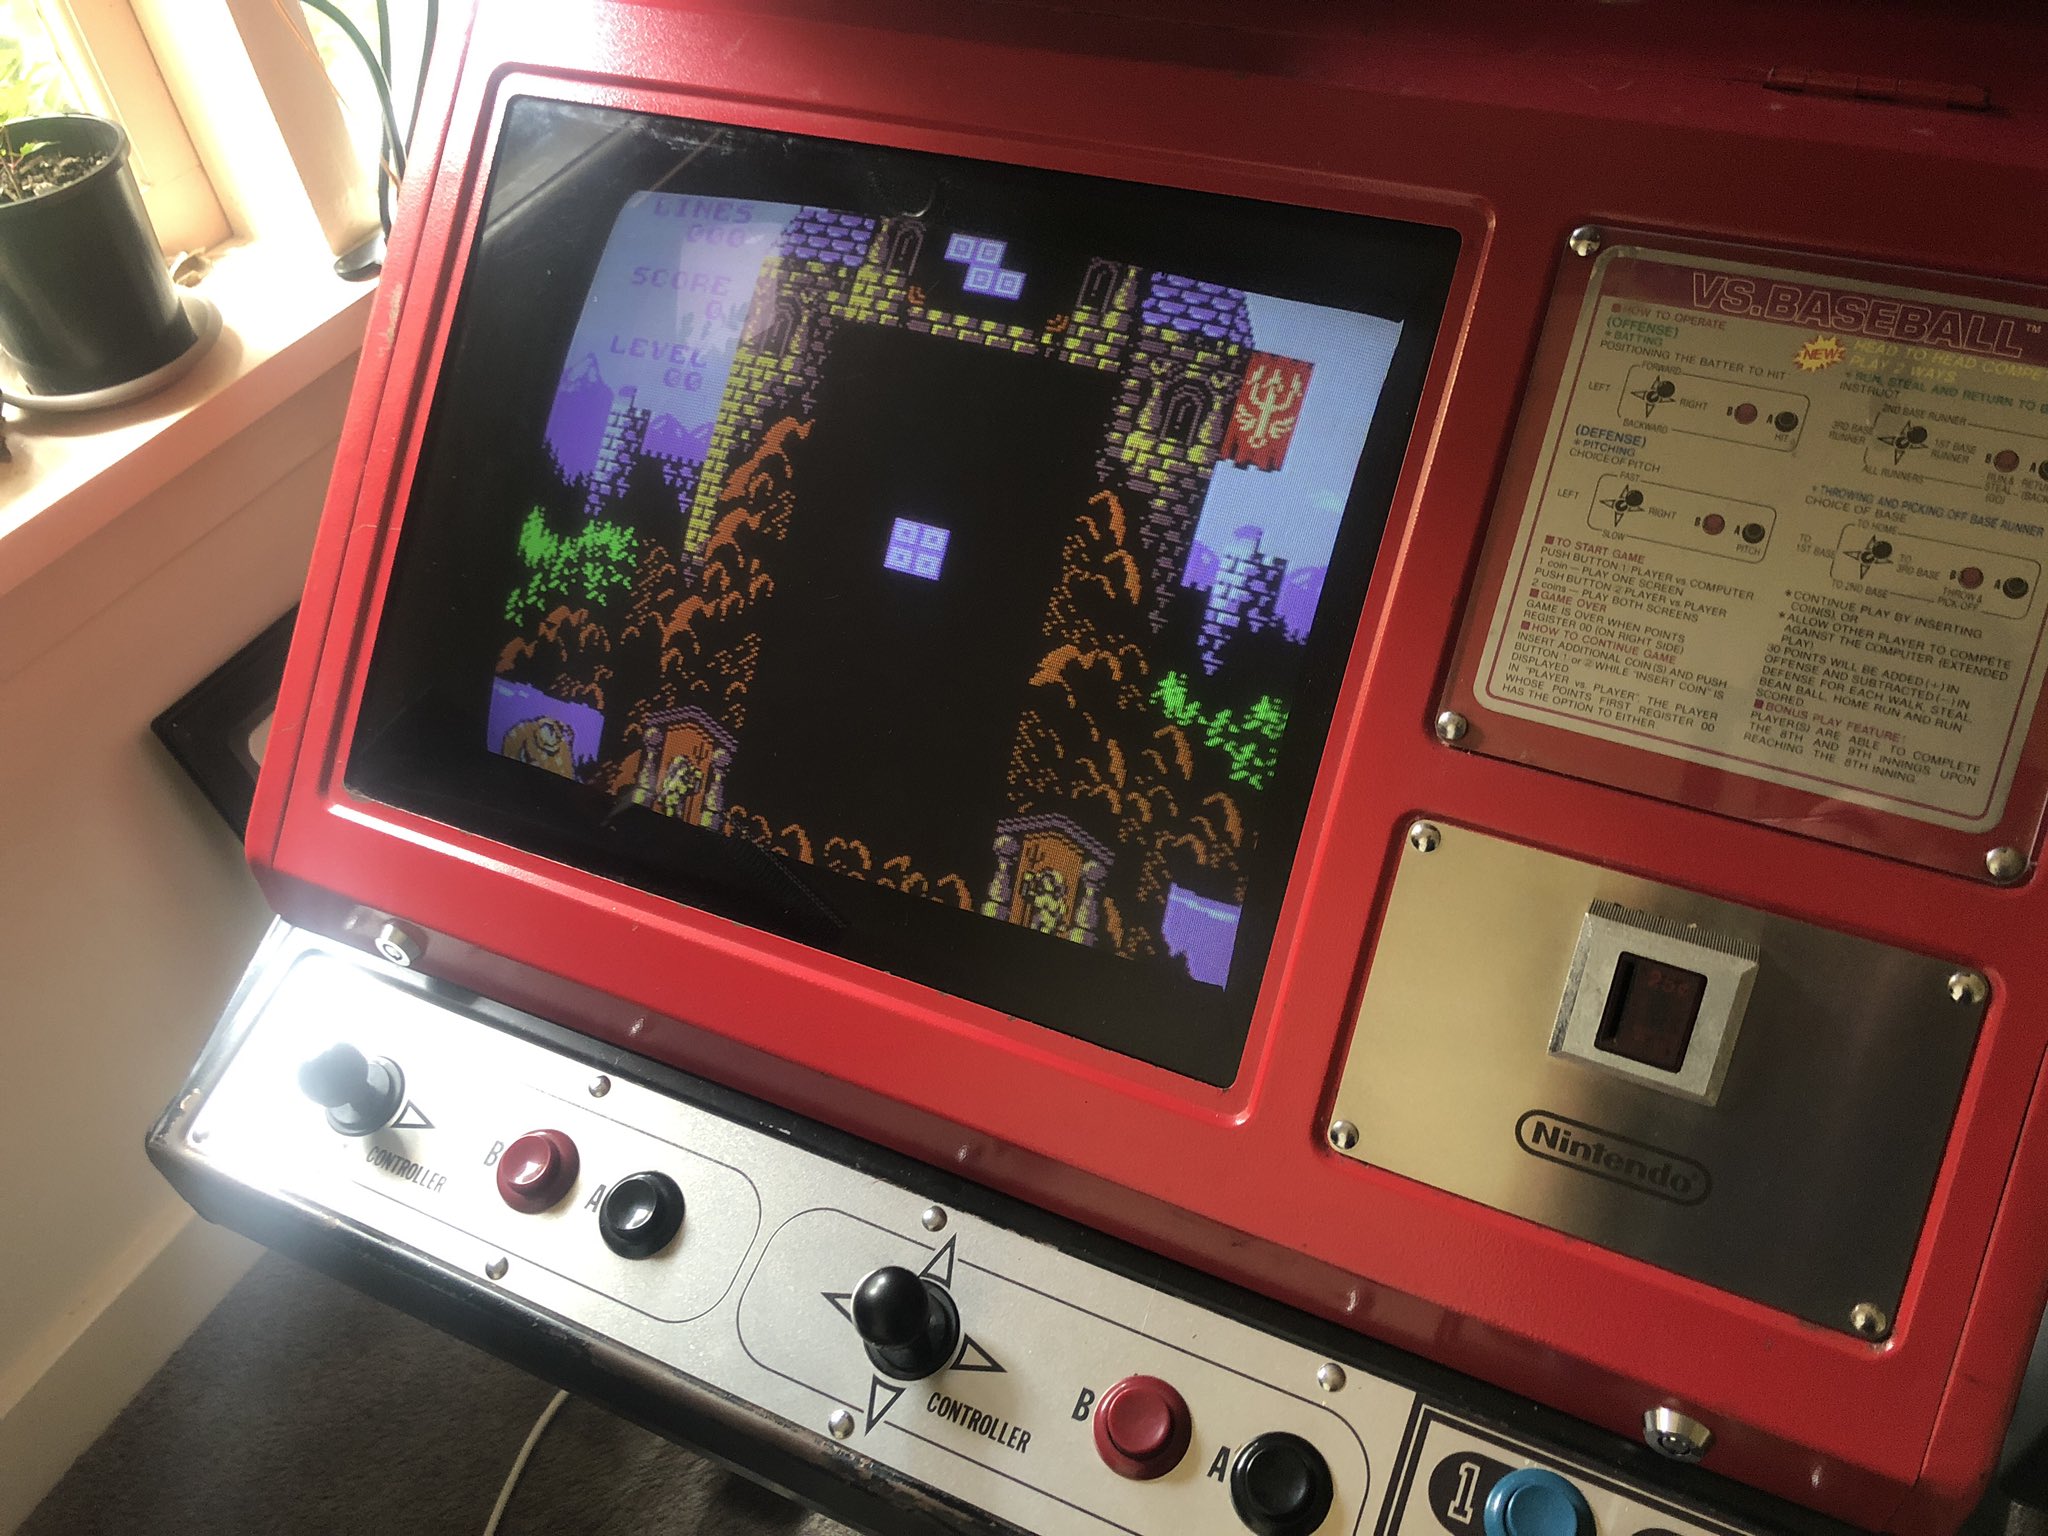
In late 2020, I was contacted by a guy on twitter. He showed me that he got my NES game, From Below, up and running on his Nintendo Vs. System arcade cabinet.
@matthughson your game could have look amazing on VS unisystem. Just that mow the color pallete is not correct due to VS unisystem use a specificl ppu. Would be cool if you can make a version that support PPU001. pic.twitter.com/UsT6TPOw6P
— Duey (@Duey68726260) November 26, 2020
As you can see, it looks kind of messed up, but there it is running on an arcade system. I actually had very little idea was the Nintendo Vs. System actual was at the time, but I came to learn that is was a series of arcade systems based on the NES, released by Nintendo in the 80’s. It had a few dozen games released for it; most (if not all) were ports of NES games.
So I decided to take a night and see if I could fix up those palette issues, and anything else that crops up.
That night turned into a month, where I completely retrofitting From Below to feel like a true arcade game, and it would become the first Vs. System release in 30 years!
You can download and play the ROM for free: http://vs.frombelowgame.com/
The actual process to do this, was pretty straight forward, so I wanted to share the details here with the hopes of others porting their own games and helping that small but passionate community thrive!
I’ll break the work down into 3 categories:
Must Fix: the things every game must do to be playable on the Vs. System.
Should Do: the things that you really should do if you want this to feel like a real arcade game.
Nice to Have: the things that aren’t required but are important to the Vs. System community.
Preamble
A couple things to get out of the way first.
From Below was an NROM game (mapper 0), and that makes this process simpler. If you are using a mapper for your game, you will need a compatible daughter board for it to run on a Vs System. I won’t cover that here.
Emulator support for Vs. System is pretty spotty. I found the best emulation was from Mesen, which fully supports all PPUs, as well as all arcade specific functionality (insert coin, etc). However, it tends to crash if you are trying to use the cross-system communication available on the Vs. Dual System.
From Below and Vs. From Below are open source and can be viewed here: https://github.com/mhughson/mbh-firstnes/tree/master/game
From Below and Vs. From Below actually compile out of the same code base. To do this, I have preprocessor define for VS_SYS_ENABLED. If you see code wrapped in that, you will know that this is some Vs. System Specific code, and probably want to take note.
These 2 pages are going to be your best friends. Bookmark them. A lot of the stuff in this article will be glossing over the details. I’ll leave it to you to dig into these 2 pages if you want more specifics.
https://wiki.nesdev.com/w/index.php/Vs._System
https://wiki.nesdev.com/w/index.php/PPU_palettes
Must Fix
ROM Header
If you want to test your came in an emulator, you need to edit you iNES header of your ROM. You will need to set the “vs system” flag to On, and set a PPU you want to target by default. You will need to target iNES 2.0 if you aren’t already.
Here’s what the Vs. From Below header looks like:
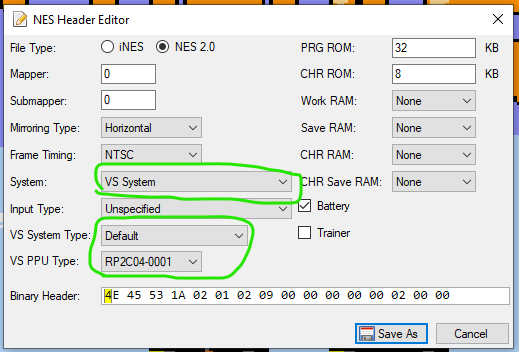
I’ll go into the detail of the PPU later.
The details on which bits control what are covered here: https://wiki.nesdev.com/w/index.php/INES
Palette Swap
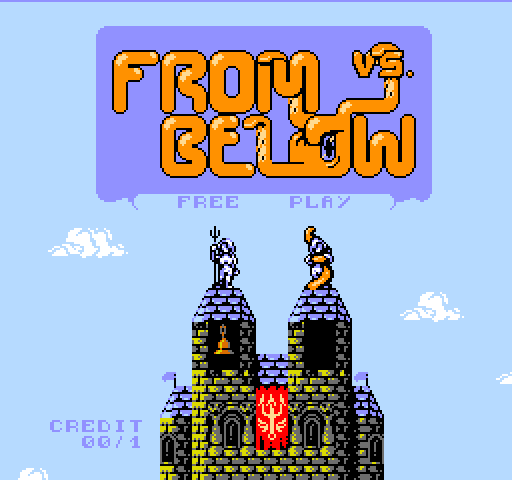
The first thing you are going to notice is that your colors don’t look right. Although the Vs System and the NES are almost identical, one key difference is the PPU; specifically how it deals with color.
The Vs. System actually has 6 flavors of PPU, and they each store colors in a different order. So while color index 0 on the NES is Grey, on on Vs System PPU RP2C04-0001 it’s Peach, and on PPU RP2C04-0002 it’s black.
Your job will be to remap the color requests from NES color space to the color space of the PPU you are targeting on the Vs. System.
So going back to the last example, when your game says that something is color 0, you know that means “grey”, and so if you are on PPU RP2C04-0001 you will redirect that to index 0x09 (RGB value 333).
How your game handles that will be specific to your engine. If you are using neslib like I did, it’s fairly simple, as it already had a look up table to handle fading things in and out. I simply hooked into that.
You can find the look up tables here:
https://github.com/mhughson/mbh-firstnes/blob/master/game/LIB/neslib.s#L1515
The actual looking up gets mapped here:
https://github.com/mhughson/mbh-firstnes/blob/master/game/LIB/neslib.s#L1440
And here:
https://github.com/mhughson/mbh-firstnes/blob/master/game/LIB/neslib.s#L289
I have documented all the PPU color mappings here: http://forums.nesdev.com/viewtopic.php?p=260764#p260764.
I have also written a python script to generate these table for you here, should you want to add another PPU or adjust some of my choices (PPU mapping is not always 1 to 1): https://github.com/mhughson/mbh-firstnes/blob/master/game/nes_to_vs_ppu.py
Pet the Watchdog
The Vs. System has something called a “watchdog timer“. If you don’t check in with this timer every 1.2 seconds the system will reset. The good news is, you are probably already doing this!
To “pet the watchdog”, all you need to do is read from address $4017, which as you probably know is also where player 1’s input is stored.
What may trip you up is long transitions where $4017 is not read. For example during a long fade in or out. Because of this I would make sure you are reading $4017 in you NMI handler, or similar.
Controller changes
Controllers are a little odd in the Vs. System. First off, there are 2 different configurations. Both have 2 standard player controls, but 1 has an additional “1” and “2” buttons, while the other has 4 of there numbered buttons:

The joysticks, A and B buttons map 1 to 1 with the NES, but the number buttons are not obvious. Here’s how they are mapped:
1 (blue): Player 1 - Select
2 (green): Player 2 - Select
3 (red): Player 1 - Start
4 (yellow): Player 2 - Start
So depending on your game, this may or may not be “must have”. You may need to rewire some input to be functional. For example if Player 1 pressing Start brings up a menu for you, you need to change that to look at the input for Player 2 Select Button (2 – Green), so that the cabinets with only buttons “1” and “2” can still function.
Should Do
Support Multiple PPUs
You may have noticed, if you looked at my implementation of palette remapping, that I actually support all 6 Vs. System PPUs and the NES PPU in Vs. From Below.
There is no “default” PPU with the Vs. System. PPUs came with the games that used them, so which PPU an owner has will depend on what games they own. As a result, it is ideal to support all PPUs so that the game can be enjoyed by the entire community.
I support multiple PPUs via dipswitch settings (which I will cover later), but you could also release multiple builds of your game if you prefer (although that’s not ideal).
The code to support multiple PPU palette mappings is already in my original example above.
Dip Switch Settings
Each Vs. System game has access to 8 dip switches that can each be either on of off.
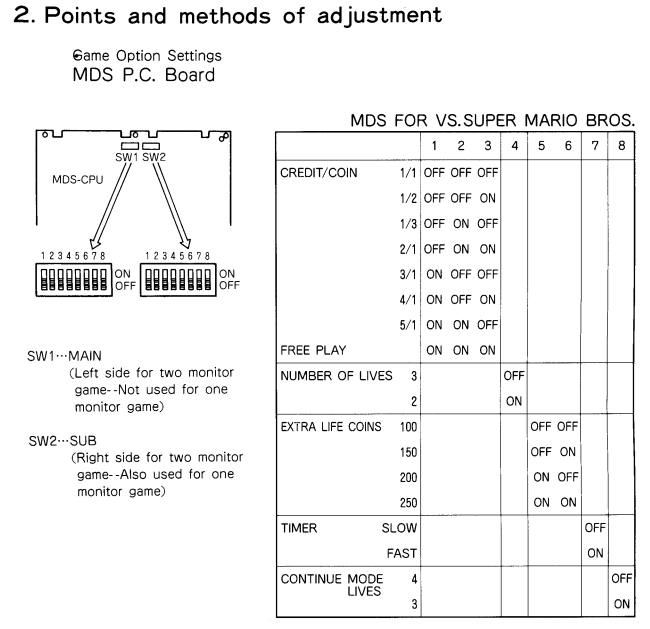
Ideally, the PPU choice would be controlled via dipswitch so that the owner does need to change PPUs to play your game.
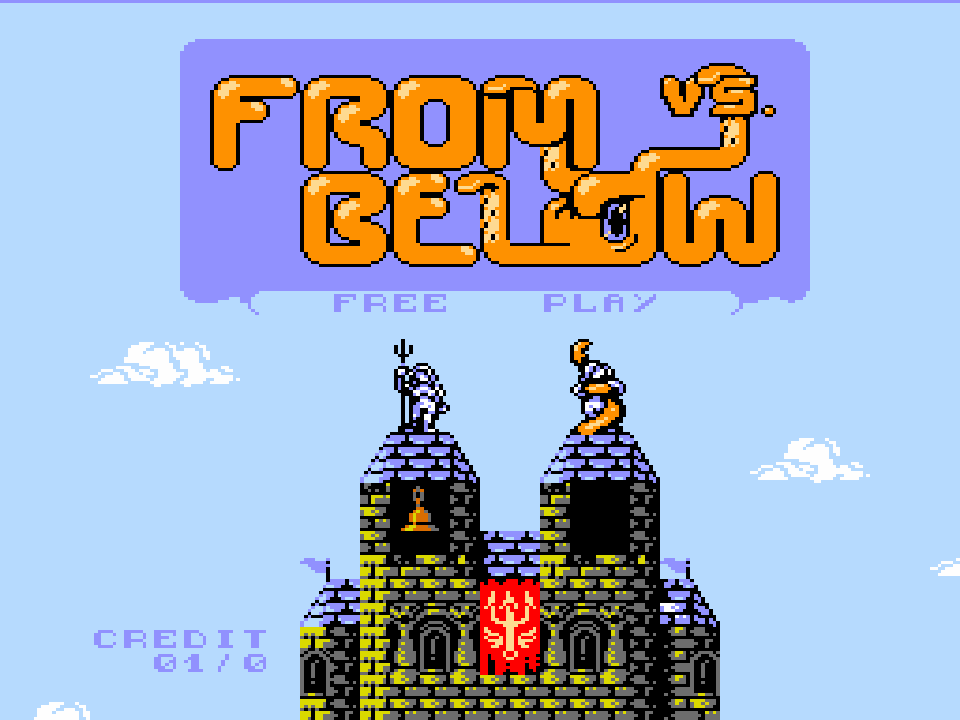
In addition to this, if you support coin-operated play, that should be configured here as well. Here is what Vs. From Below’s dip settings control:
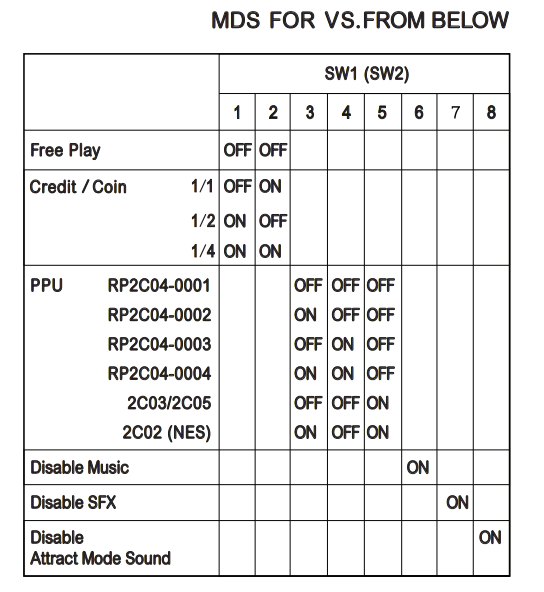
Reading Dipswitch settings is simple. They are stored in a number of bits across $4016 and $4017. Reading them once at boot up seems fine for the arcade owners I spoke with.
Here’s what my C macro to read each dipswitch looks like (note: starting at 1 to match user facing names):
#define DIP1 (PEEK(0x4016) & 1<<3)
#define DIP2 (PEEK(0x4016) & 1<<4)
#define DIP3 (PEEK(0x4017) & 1<<2)
#define DIP4 (PEEK(0x4017) & 1<<3)
#define DIP5 (PEEK(0x4017) & 1<<4)
#define DIP6 (PEEK(0x4017) & 1<<5)
#define DIP7 (PEEK(0x4017) & 1<<6)
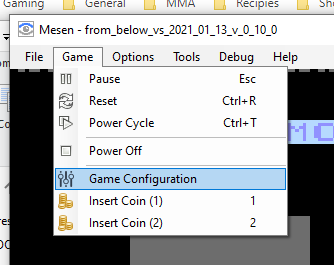
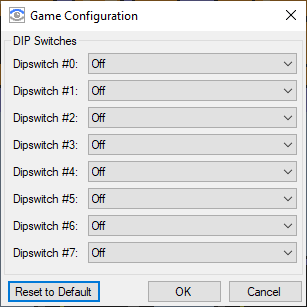
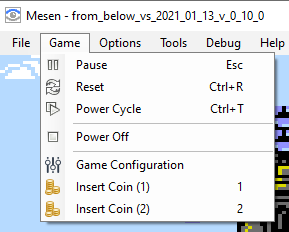
#define DIP8 (PEEK(0x4017) & 1<<7)In Mesen, the dipswitch settings are under “Game -> Game Configuration” when you are running a Vs. System Game.
Screen Saver
Try to avoid having any screen stay up indefinitely. You want to avoid burn-in on these old monitors. Ideally you would add an attract mode, but I will save that for the “nice to have” list.
Even if you have an attract mode though, there may be areas in your game where, previously, the player could sit forever (for instance a name entry screen). You will need to try and eliminate those.
Coin Reader
An arcade game isn’t really an arcade game without it being coin-operated. You might assume that this is handled by the hardware, but it’s actually up to each game to track when a coin is dropped, and how many are banked up.
Coin status (for both slots) is stored in $4020, but this is a transient state, so you need to read it every frame to ensure you don’t miss a coin drop. For this reason, you should probably do your coin reading in NMI.
You also need to make sure it goes back to 0 before reading it again (see CREDITS1_PREV, and CREDITS2_PREV in the following example):
For Vs. From Below, this is done here:
https://github.com/mhughson/mbh-firstnes/blob/master/game/LIB/neslib.s#L40
The counter that gets incremented in NMI, is dequeued back in the main game loop here:
https://github.com/mhughson/mbh-firstnes/blob/master/game/main.c#L516
In Mesen, if you are running a Vs. System game, you will see options to insert coins under “Game”.
Nice to Have
Logo
Adding the “Versus” moniker to your title screen will go a long way to make this game feel like more than a quick and dirty port.

Streamline Frontend Flow
Arcade games tend to flow very quickly from the title screen, and into gameplay. Having lots of menus in between feels out of place in an arcade.
For Vs. From Below I complete redid the settings screens to be big, large buttons with limited options. I also added a timer so that players couldn’t sit on here forever.
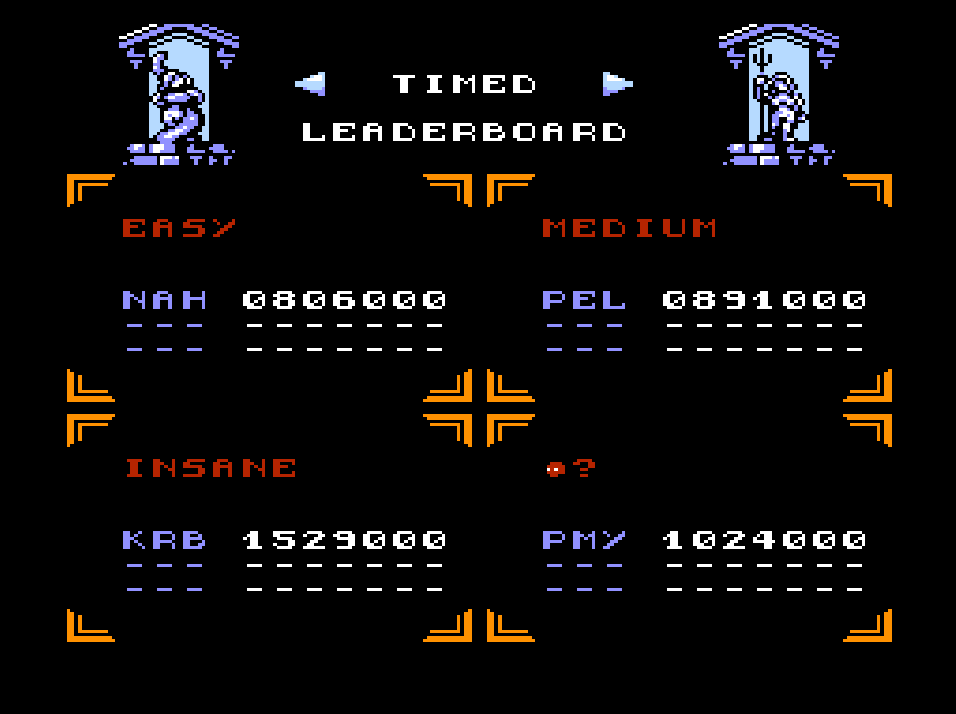
High score tables
Nothing says “arcade” like entering your initials in a highscore table!
Remove Pause
Arcade games don’t have pause! Rip yours out of there.
Service Button
The Vs. Arcade System comes equipped with a “Service Button” which is held under lock and key, so that only the owners can access it. The button doesn’t do anything, except write to bit $4016.2. It is up to the game what they wish to do with this information.
A lot of commercial games simply use this button to get a credit to the player (used in the case where the machine ate a quarter or something). But you could do something much more complex, like bring up a debug menu! It’s up to you what you think would be useful for your game.
In Vs. From Below is just gives the player a credit.
Something to keep in mind though is that the operator could hold that button for any length of time, so you should be checking for “release” not press.
Here’s where I can checking for it on Vs. From Below:
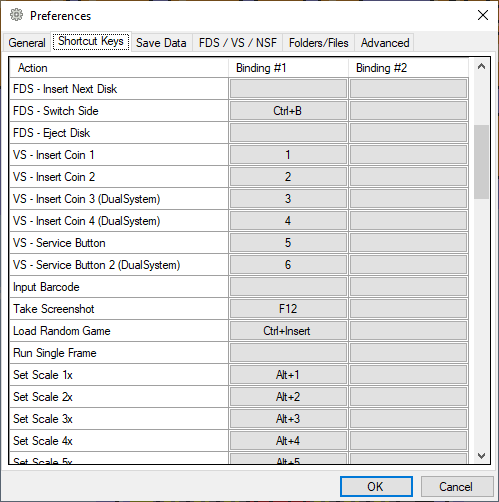
In Mesen, you can bind the Service Button to a key in Options->Settings->Shortcut Keys: VS – Service Button.
Maintenance Coin Counter
The Vs. System also comes with a hardware coin counter. I believe the idea here was to make sure that the amount of money in the tray matches the number of coins believed to have been dropped in, but I’m not sure.

You might expect this to be wired up to the coin slot itself, but its not. You need to trigger it yourself from software.
You can see this being done in Vs. From Below here:
Conclusion
And that’s it! Although a listed a lot of optional things, the required amount of work is actually quite small. Hopefully more developers will start releasing their games for the Vs. System!
If you are interested in this, and need help, don’t hesitate to ping me on twitter (https://twitter.com/matthughson) or on the From Below Discord (https://discord.gg/6jEcHEx).